192.168.1.1 Login
If you’ve ever tried to manage your home or office Wi-Fi network, you’ve likely come across the IP address 192.168.1.1, which is the private gateway address typically used by well-known brands such as TP-Link, Linksys, NETGEAR, D-Link, and PLDT to access the admin login.
Many people attempt to update their Wi-Fi settings, where they encounter the IP address 192.168.1.1, which is typically associated with the router for managing network settings. From here, you can change the wifi name and password, improve security, manage connections, and update firmware.
Learning how to use 192.168.1.1 is essential for troubleshooting and resolving issues effectively. And take control of your network settings.
How to Log In to the 192.168.1.1 Admin Panel: Step-by-Step Access Guide
Here are the easy and reliable step-by-step instructions on how to log in and gain access to the 192.168.1.1 admin login panel.
Step 1: Connect to Your Router Network
Firstly, ensure that your device, such as a PC, laptop, or smartphone, is connected to the router’s Wi-Fi. If your network is unstable and you are not connected to the router’s network, the login page can’t be loaded.
Step 2: Launch a Web Browser
Open your preferred web browser, such as Chrome, Firefox, Edge, or Safari. In the address bar, type the IP address http://192.168.1.1 into the web browser and press Enter.
Step 3: Enter the default username and password.
Here, the login page appears, asking for a username and password, which are commonly admin/admin or password.If these default details are not working, check the sticker on the back of your router for the printed details.
Step 4: Access the Admin Dashboard
After logging in, you will reach the admin homepage, from which you can manage and configure settings such as Wi-Fi SSID, password, parental control, and many other options.
Tips:
If you encounter an issue while accessing the login page, try using a different device or clearing your cache and cookies.
If you forgot your login details, you need to reset your router so it can log in again using its default settings.
Can't Remember Your 192.168.1.1 Admin Username or Password? Fix It Now
If you don’t remember what your username and password are for the 192.168.1.1 login, don’t worry! Here is the simple process for recovering your router access.
Check the default login details.
✦ Find the label on the back or bottom of your router.
✦ Find the username and password, which are printed, such as admin/admin or admin/password.
✦ Use this default information and try logging in again at 192.168.1.1.
Search Online for Default Login Info
✦ If you did not understand the label, and it is blurred, then search online for the default login details of your router.
✦ Example: “TP-Link default login details.”
Try resetting to factory settings.
✦ Look for the reset button on your router.
✦ Use a pin to press and hold the button for 10 to 15 seconds.
✦ Wait until your router reboots and returns to its factory settings.
Log in again using the default settings.
✦ Open the web browser at http://192.168.1.1 when the reset is complete.
✦ Enter the default information to log in again.
Set a New Username and Password
✦ When the homepage is open, go to settings and create a strong, customized password.
✦ Save your new login information to avoid this process.
Default Logins for 192.168.1.1 Router IP
To access your router through 192.168.1.1, enter the default username and password to reach the homepage. Below is a quick-reference table of usernames and passwords provided by default by the default providers. Here are the most common router brands.
Username | password | ||
192.168.1.1 | admin | admin | |
D-Link | 192.168.1.1 | admin | admin |
NETGEAR | 192.168.1.1 | admin | password |
Linksys | 192.168.1.1 | admin | admin |
192.168.1.1 | admin | admin | |
Zyxel | 192.168.1.1 | admin | 1234 |
ASUS | 192.168.1.1 | admin | admin |
192.168.1.1 | admin | admin | |
Belkin | 192.168.1.1 | admin | – |
PLDT (Philippines) | 192.168.1.1 | admin | 1234 or pldtadmin |
How to Change Router IP Address on TP-Link, D-Link, and NETGEAR Routers
Changing your router’s default IP address, such as 192.168.1.1, enhances your network security and helps prevent IP address conflicts. Here are the step-by-step instructions:
TP-Link Routers:
1 . Log in to TP-Link Router Admin:
✦ Firstly, ensure your device is connected to the router.
✦ Open your browser and go to http://tplinkwifi.net.
✦ Enter the default login information, typically admin/admin.
2 . Go to Network > LAN:
✦ On the homepage, there is a network setting on the left sidebar; press on it.
✦ Then choose LAN from there.
3 . Change the IP Address:
✦ Here is the IP address space, which shows 192.168.1.1.
✦ Change it to the new IP address, such as 192.168.0.1.
4 . Save and Reboot:
✦ Press Save.
✦ The router will come up with the new IP.
✦ Use the new IP address and log in again.
D-Link Routers:
1 . Access D-Link Admin Page:
✦ Connect to the network through Wi-Fi or LAN cable.
✦ Launch your preferred browser and enter 192.168.1.1.
✦ Log in with the default credentials, such as admin/admin, or leave the password field blank.
2 . Navigate to Setup > Network Settings:
✦ Go to the menu and select ‘Setup’.
✦ Choose Network Settings from there.
3 . Edit the Router IP Address:
✦ In the LAN Settings, search for the Router IP Address box.
✦ Replace the address with a new IP address, such as 192.168.10.1.
4 . Save and Restart:
✦ Click Save Settings.
✦ It will restart the router and use the new IP address.
5 . Log in Using New IP:
✦ Log in again, open the web browser, and type the new IP address to gain access.
NETGEAR Routers:
1 . Log in to the NETGEAR Admin Interface:
✦ Open your browser and type http://routerlogin.net.
✦ Enter the default admin credentials, like admin/password.
2 . Go to Advanced > Setup > LAN Setup:
✦ On the homepage, click Advanced Settings.
✦ Select Setup > LAN Setup.
3 . Change IP Address:
✦ In the LAN TCP/IP Setup section, the present IP address is shown.
✦ Replace it with a new IP address, such as 192.168.2.1.
4 . Apply and Reboot:
✦ Press Apply to save the changes.
✦ The router will restart and then use the new IP.
5 . Log in Again through the New IP:
✦ Open your browser, and reconnect using the new IP address.
Important Notes for All Routers:
✦ After this process of changing IP addresses, the old login credentials are no longer valid.
✦ To avoid network clashes, use a stable private IP range.
✦ Save your new IP address somewhere for future login.
✦ If your network is not functioning smoothly and is causing connectivity errors, reset the router and try logging in again.
How to Configure Your Router for Fast, Secure, and Reliable Internet
If you want a secure, fast, and reliable internet connection, it is necessary to understand how to configure your router. A complete configuration protects you from uncertified access. Whether you are updating your router or setting up a new one, it provides efficient and stable connectivity.
Connect your router to a power source via a modem or LAN cable for optimal stability.
Open your web browser and type the IP address 192.168.1.1 into the address bar; the 192.168.1.1 admin login page will appear. Enter the default login username and password, such as admin/admin.
When you log in, it’s essential to change the default login details according to your choice to protect your router’s network from unauthorized access.
Go to the settings; here, you will find the option to change the username and password of user 192.168.1.1.
Now, if you want to change your Wi-Fi name, go to the wireless settings option, choose an SSID name that you prefer, and secure it using the WPA2 or WPA3 encryption method.
Update the details from here and set up a new, strong password that combines letters, numbers, and special characters. Avoid using simple passwords that anyone can easily guess; instead, make them complex to prevent misuse.
Ensures DHCP (Dynamic Host Configuration Protocol) settings are enabled, as they are part of Wi-Fi settings.
Open the settings and monitor if this option is permitted. It allows the router to allot IP addresses to the linked devices instantly. It may protect your router from network errors or clashes.
It’s essential to determine your network connection type; go to the settings. Select from dynamic IP used for most individuals, PPPoE by a few ISPs, or static if the ISP gives particular network information. For reliable connectivity, ensure that you enter the correct details.
Utilize the advanced settings, including MAC filtering, parental controls, and guest networks. By enabling these options, you will manage usage, enhance security, and control guest traffic.
Click Save after changing the settings; your router will then restart to apply the new configuration. You can reconnect by using new network settings after the reboots are complete.
Connect the device and monitor the internet speed using speedtest.net. Ensure that your devices are connected to a smooth and stable internet signal.
Knowing how to configure your router makes it easier to search, live stream, game, or work from home.
Update your router’s firmware regularly and place it in a central, open area for optimal experience and coverage.
Common Troubleshooting Issues with 192.168.1.1
If you are facing errors while logging in to the router by using the IP address 192.168.1.1. No need to worry! We are here to resolve your problems. Whether you find clashes in network settings, logins, or device misconfiguration. Below are the most common issues and a guide on how to solve them:
1. Typing Errors in the IP Address
It’s essential to note that you are entering the correct IP address; this is the most common mistake people typically make. Users often type 192.168.l.l (with the letter “L”) or 192.168.1.1 (with periods), which can cause errors or conflicts. Always recheck and enter the correct IP address, 192.168.1.1, to avoid such issues.
2. Router IP Address Is Different
Not all routers use the IP address 192.168.1.1; the IP address varies according to the router brand. Some users may use 192.168.0.1 or 192.168.10.1, particularly if they have been assigned these addresses by their ISP or have changed them manually. On Windows, open a command prompt to search for your default gateway. On a Mac, go to System Preferences > Network > IP to view the router’s IP address.
3. Not Connected to the Router's Network
Many people encounter the issue that the site can’t be loaded. Ensure you are connected to the router’s network to access 192.168.1.1 via Wi-Fi or a LAN cable.
4. Browser or Cache Issues
Often, browsers report or block access due to outdated cache or cookies. You will need to clear the browser cache and then open the IP address or use a different browser.
5. IP Conflict or Misconfigured Network
If another device uses the same IP address or has a static IP address outside the range, you may be blocked, or your login may not work. So, monitor this and restart your router to ensure they are set to DHCP to obtain automatic IP addresses.
6. Router Not Responding or Crashed
If your router does not respond, it means your IP address is not loaded in the web browser. Unplug the router for a few moments and then plug it back in. Wait until it’s on, and then try to reaccess the IP address to reach the dashboard.
7. VPN or Proxy Blocking Local IP
Check if your VPN is on; it may cause errors accessing the 192.168.1.1 login page. You have to disable the VPN and firewall before logging in.
8. Firewall or Antivirus Blocking Access
Some firewalls or security software can block your local IPs from accessing the homepage. Disable the firewalls for a short period and then recheck.
9. Forgot Router Username/Password
If you don’t remember your login details, such as the 192.168.1.1 password or username, you will not be able to access the homepage. Check the default login credentials on the back of your router. It does not work; then reset the settings to reach the default factory settings.
Common Mistyped IP Addresses and What’s Wrong with Them
Mistyped IP | What’s Wrong | Correct IP |
192.168.1o.1 | Uses the letter “o” instead of the number “0” in 10 | |
192.168.l.1 | Uses the letter “l” instead of the number “1” | |
192.168.1.1.1 | Has five segments instead of four – IPs must have only four octets | 192.168.1.1 |
192.168.11 | Missing dots between numbers – not a valid IP format | 192.168.1.1 |
www.192.168.1.1.com | Adds a domain-style prefix and suffix – 192.168.1.1 is a local IP, not a website | http://192.168.1.1 |
http//192.168.1.1 | Missing the colon (:) after “http” – malformed URL | http://192.168.1.1 |
192.168.0.l | Uses the letter “l” instead of the number “1” | |
192.168.l.l | Double dots between octets – invalid formatting | 192.168.1.1 |
192.168.1.256 | One octet exceeds 255 – IP address octets must be between 0 and 255 | 192.168.1.1 |
Accessing Your Router via 192.168.1.1: Step-by-Step Guide
Understanding your IP address, 192.168.1.1, is essential to accessing the network settings. The router IP address is known as the default gateway to reach the dashboard. Filing the IP on any device is a straightforward process. Here is the complete guide:
On Windows:
Tap Windows + R to open the Run dialog.
Write cmd and press Enter to open the Command Prompt.
Type ipconfig and press Enter.
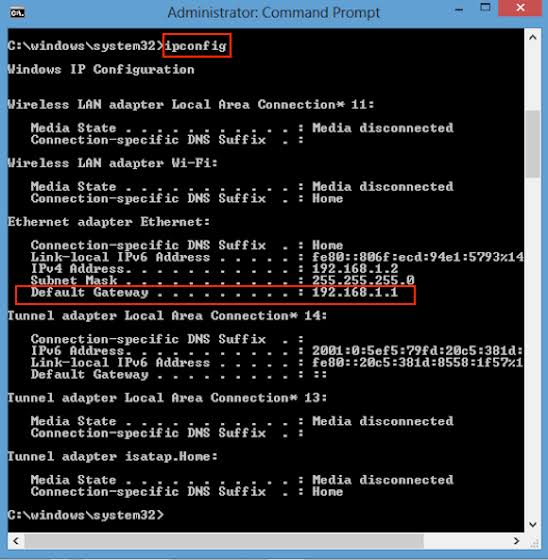
● The IP address 192.168.1.1 of this router is displayed under your network adapter.
On macOS:
Go to System Preferences settings > Network.
Choose your present network connection.
Go to the advanced settings, then open the TCP/IP tab.
Your IP address appears next to the Router.
On Android:
Open Settings > Wi-Fi.
Click on your network connection.
Scroll down to view the gateway, where the router’s IP address is displayed.
On iPhone/iPad (iOS):
Go to Network Settings > Wi-Fi.
Click the “i” icon alongside your connected network.
This displays your router’s IP address.
When you know your IP address, 192.168.1.1, enter it in the address bar to access the router’s admin portal and network settings.
Explore 192.168.100.1 for advanced login options and manage 192.168.1.254 settings for connected devices.
PLDT Router Login: How to Access the 192.168.1.1 Admin Page
Firstly, you need to log in to your router’s admin page at 192.168.1.1 to manage your PLDT network settings. From there, you can manage the Wi-Fi name and password, ensuring security and optimal bandwidth. While you are using PLDT or a fiber modem. Here are the simple and easy steps to log in to your PLDT router:
Steps to Log In to Your PLDT Router (192.168.1.1):
✦ Connect your device to the PLDT Wi-Fi or a LAN cable.
✦ Open any preferred web browser, such as Chrome or Safari.
✦ Type http://192.168.1.1 in the web browser and click Enter.
✦ You will gain access to the PLDT router login page.
✦ Enter your default username and password.
Username: admin, pldtadmin, or user.
Password: 1234, admin
✦ Enter Login or Sign In.
✦ After logging in to your account, you can change your Wi-Fi name, password, and other network settings.
✦ Some PLDT Fiber modems use different IP addresses, such as 192.168.15.1. So it’s essential to check the IP address and login credentials from the back of your routers.
How to Change PLDT WiFi Password and SSID (WiFi Name)
It is essential to change your PLDT wifi name or password to protect your internet connection and network settings. This is a reliable process that just takes a few seconds.
Step-by-Step Guide
✦ Connect to the PLDT Network:
✦ Check that your device is linked to your PLDT WiFi or an Ethernet cable.
✦ Open a Browser:
In your address bar, write 192.168.1.1 and click Enter.
✦ Log in to the Admin Page:
Username: admin or pldtadmin
Password: 1234, admin1234, admin,
✦ If the default login details are not working for the PLDT Fiber router, try 192.168.1.1/fh.
✦ Go to Wireless Settings:
After logging in, navigate to Network > WLAN Settings > Basic Settings.
✦ Change SSID (WiFi Name):
Change the new name according to your choice in the SSID box.
✦ Change WiFi Password:
In the Password space, enter your new password, which should be strong.
✦ Save the Settings:
Click Save to update the configuration. Your router will continue to restart.
Final thoughts
Learning how to access and handle your router via 192.168.1.1 authorizes you to take control of your network settings. It helps in changing the wifi name and password, resolving issues, managing connectivity, and updating settings.
Whether you’re using a PLDT, TP-Link, D-Link, NETGEAR, or any other router, 192.168.1.1 helps you optimize your network activity, enhance security, and resolve common network errors efficiently. Recognize the login information correctly and avoid general mistyped IPs such as 192.168.l.l or 192.168.10.1.
By understanding the basics, it is easier to make a secure, fast, and smooth internet connection through 192.168.1.1.
FAQs
Your 192.168.1.1 account is usually the router’s admin username and password. Log in through the 192.168.1.1 web browser and enter the default details, admin/admin, to access the network settings.
Connect to your Huawei Wi-Fi network, open a browser, and enter IP 192.168.1.1. Enter the login credentials that are admin/admin to gain access to the homepage.
Ensure your device is connected to the router’s network, then enter the router’s IP address, such as 192.168.1.1, in the browser’s address bar. Click Enter to access the admin login page.
It’s the default private IP address used by many routers, such as TP-Link, D-Link, Netgear, and PLDT, to access the admin panel for changing the WiFi name or password, managing devices, setting up parental controls, and securing the network.
Ensure you are connected to the router’s network to gain access to PLDT. Then, open your browser and enter the IP address 192.168.1.1. Enter default details admin/1234.
Connect your phone to the router’s Wi-Fi, open a browser, and enter 192.168.1.1 in the browser address bar. Enter the login details and reach the router’s network settings.